
![]() This content is related to the Faculty of DanceRelated Faculty of Music content: n/a
This content is related to the Faculty of DanceRelated Faculty of Music content: n/a
Equipment needed
You will need a projector which can be booked through the Library Equipment Booking service. Each projector comes with a VGA cable and power cable. You can also book out Windows and Mac laptops.
If connecting to a projector using HDMI, you will need to ask for Cable #13.
If connecting to a Mac, you will need to ask for an Apple Mac Adaptor #01.
Connecting your laptop
- Turn on the projector and wait a short moment for the lamp to brighten.
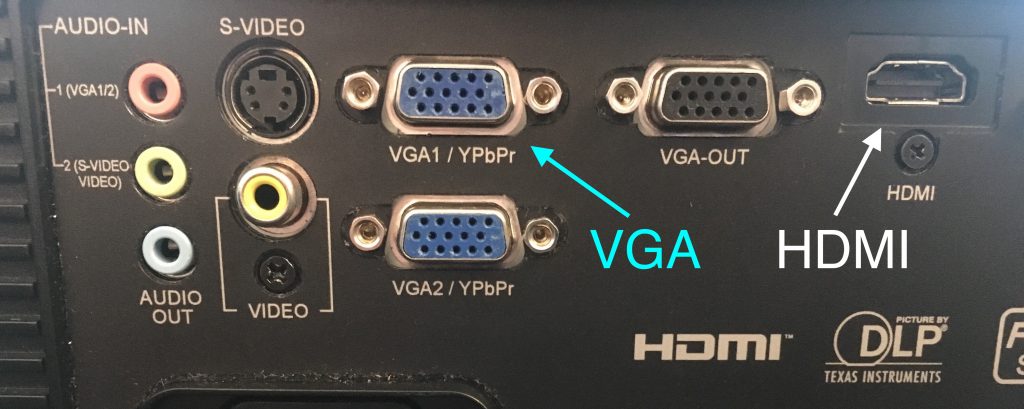
- Connect the cable from your laptop to VGA1 if using VGA, or HDMI, at the back of the projector.
- If you want to mirror your projected image and laptop screen, press the Windows key and the P key on the keyboard, and select “Duplicate“.
On a Mac, open System Preferences -> Displays -> select Arrangement tab -> tick the “Mirror Displays” box.

Adjusting your image
- If your image is blurry, gently use the focus ring to bring your image to focus. If it is still blurry you may need more space between the projector and the surface you are projecting on to.
- You can use the zoom ring to enlarge or minimise your image to better fit your projected space.
- Using the top and bottom buttons you can re-orient your image if the top or bottom is squashed.
Video Tutorials
Connecting a Laptop to a Projector with VGA
Connecting a Laptop to a Projector with HDMI
Connecting a Macbook to a Projector with VGA
Troubleshooting
Why is sound coming from the projector?
If you are using a HDMI cable, the projector will output the audio from your laptop, if you wish to mute this, follow these steps:
- Press the Menu button on the top of the projector.
- Press the Right button twice to find the menu with the Audio Settings.
- Press the Down button to enter the Audio Settings menu.
- From here you can mute the sound or control the sound volume by hitting enter to select an option and the arrow keys to adjust.
- Press the Menu button twice to exit.
Why is the projected image upside down/back to front?
If your image is flipped or upside down, or you want to set the projector up for rear or mounted projection, here are the steps you can take to find this option:
- Press the Menu button on the top of the projector.
- Press the Right button twice on the top of the projector (to select an icon that features a Screwdriver).
- Press the Up key button twice on the top of the projector (to select the “Projection” option).
- Select the different options (confirming with the “Enter” key on the top of the projector) until you find the correct option.
- Press the Menu button twice to exit.