
![]() This content is related to the Faculty of Dance
This content is related to the Faculty of Dance
The Standard video cameras available from the Library are great for taking simple recordings without having to worry about adjusting too many settings. These cameras can record high quality footage in a format that is easy and fast to transfer to your computer.
If you want more control over how your video will appear, you should consider booking one of the Pro Video Cameras instead.
Setting up the camera
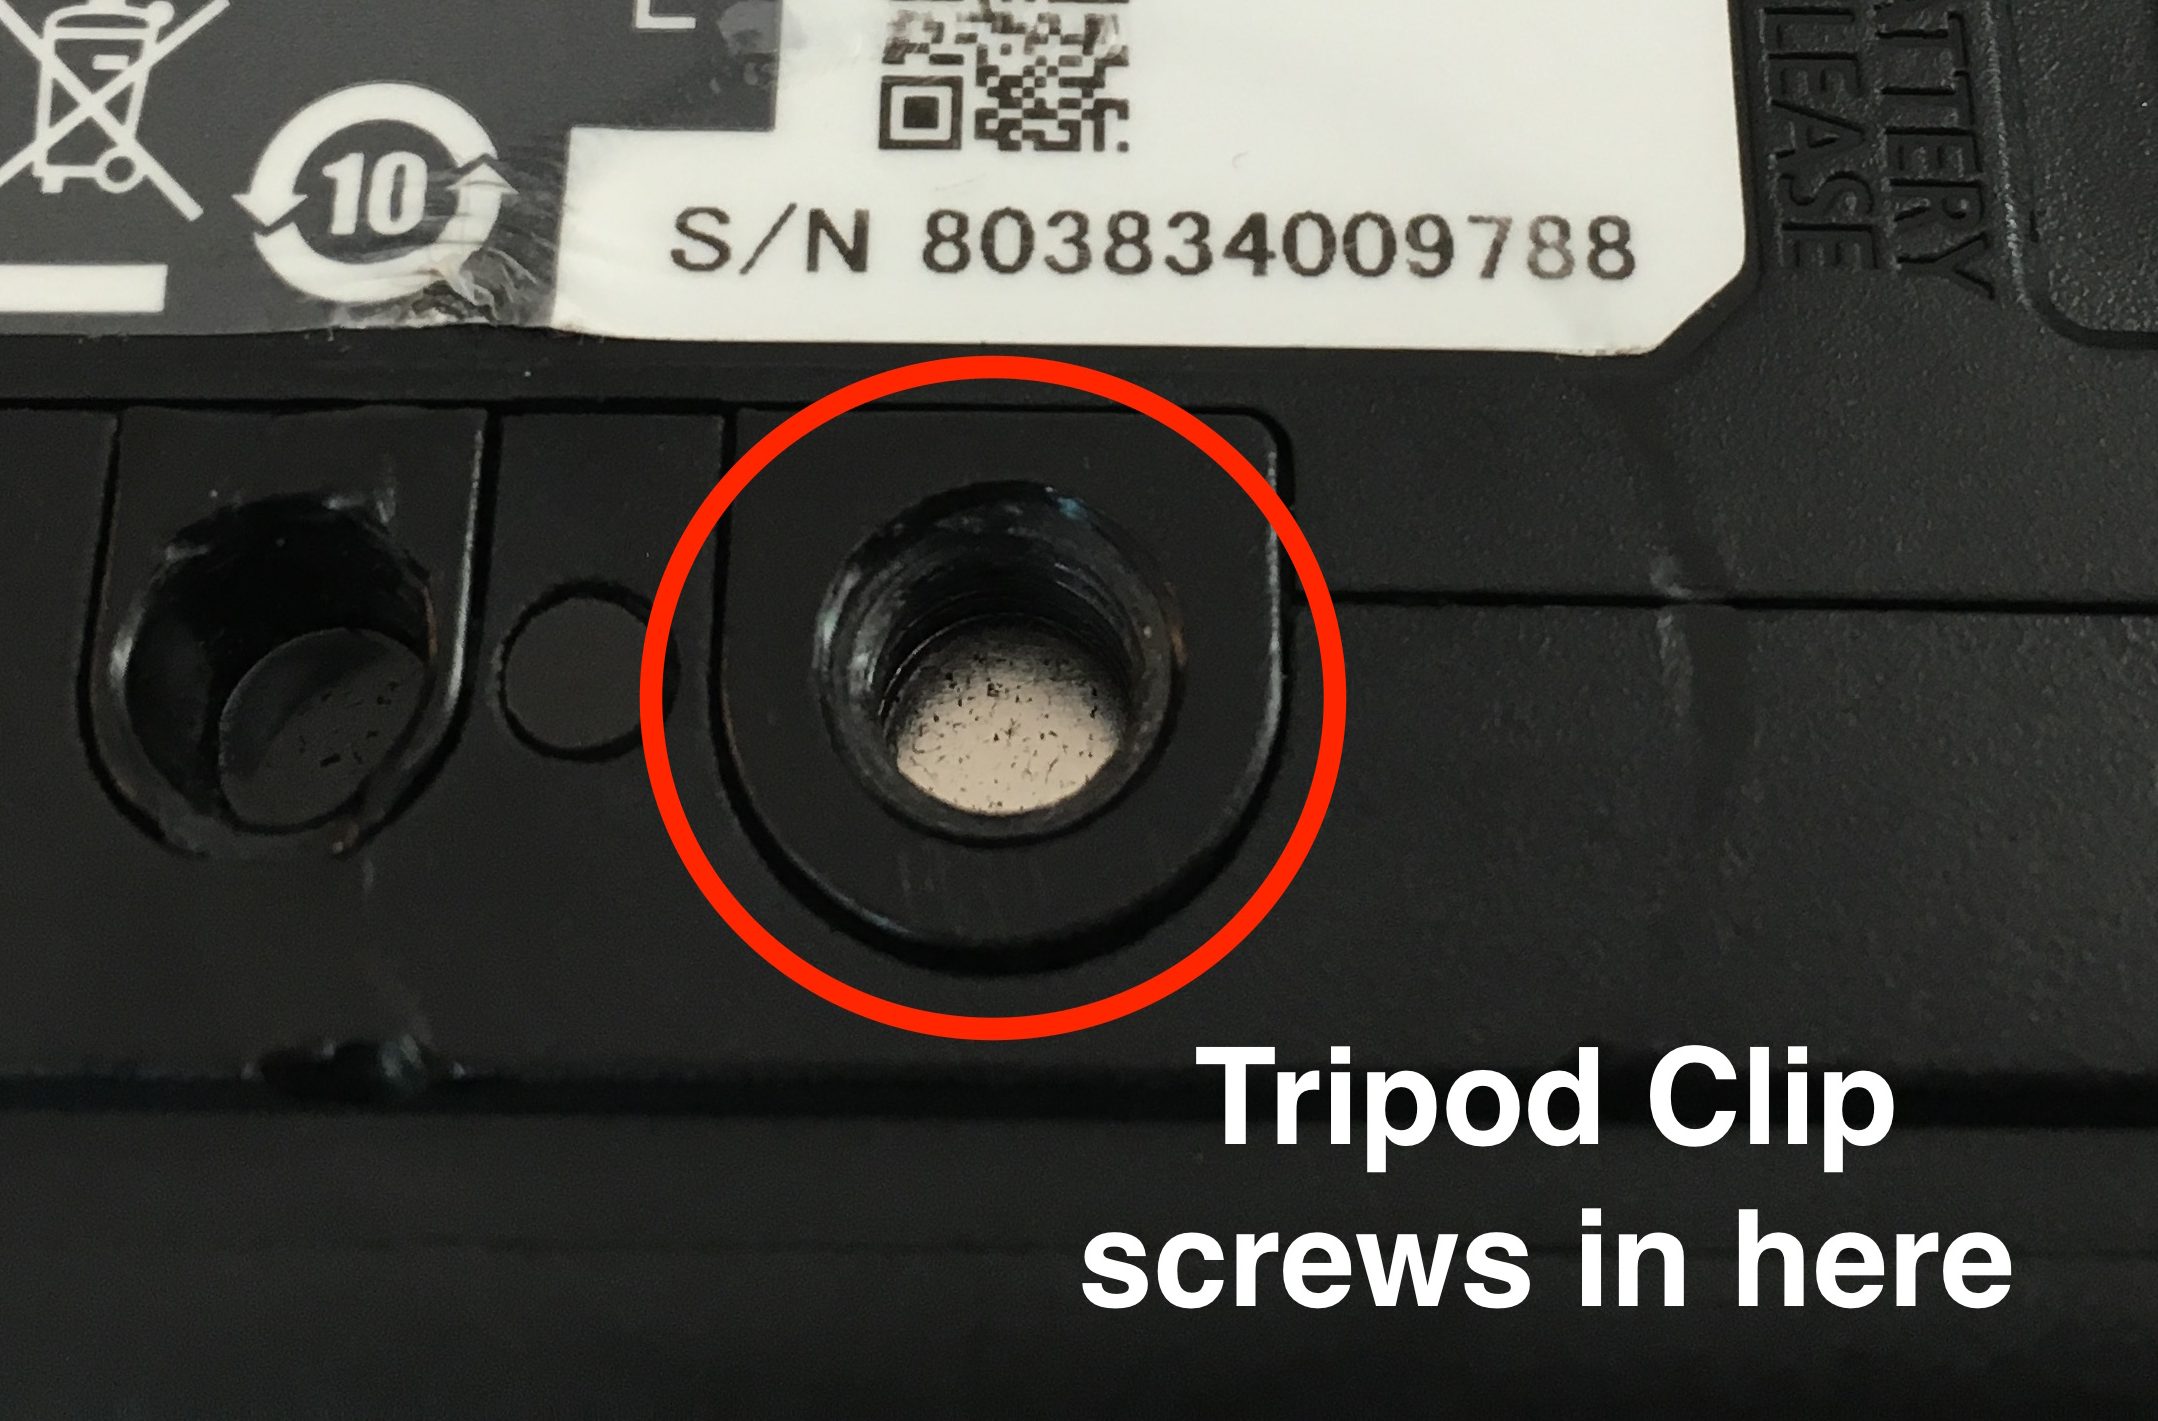
If using a tripod, ensure the tripod mount is screwed securely to the bottom of the camera and attached to the tripod.
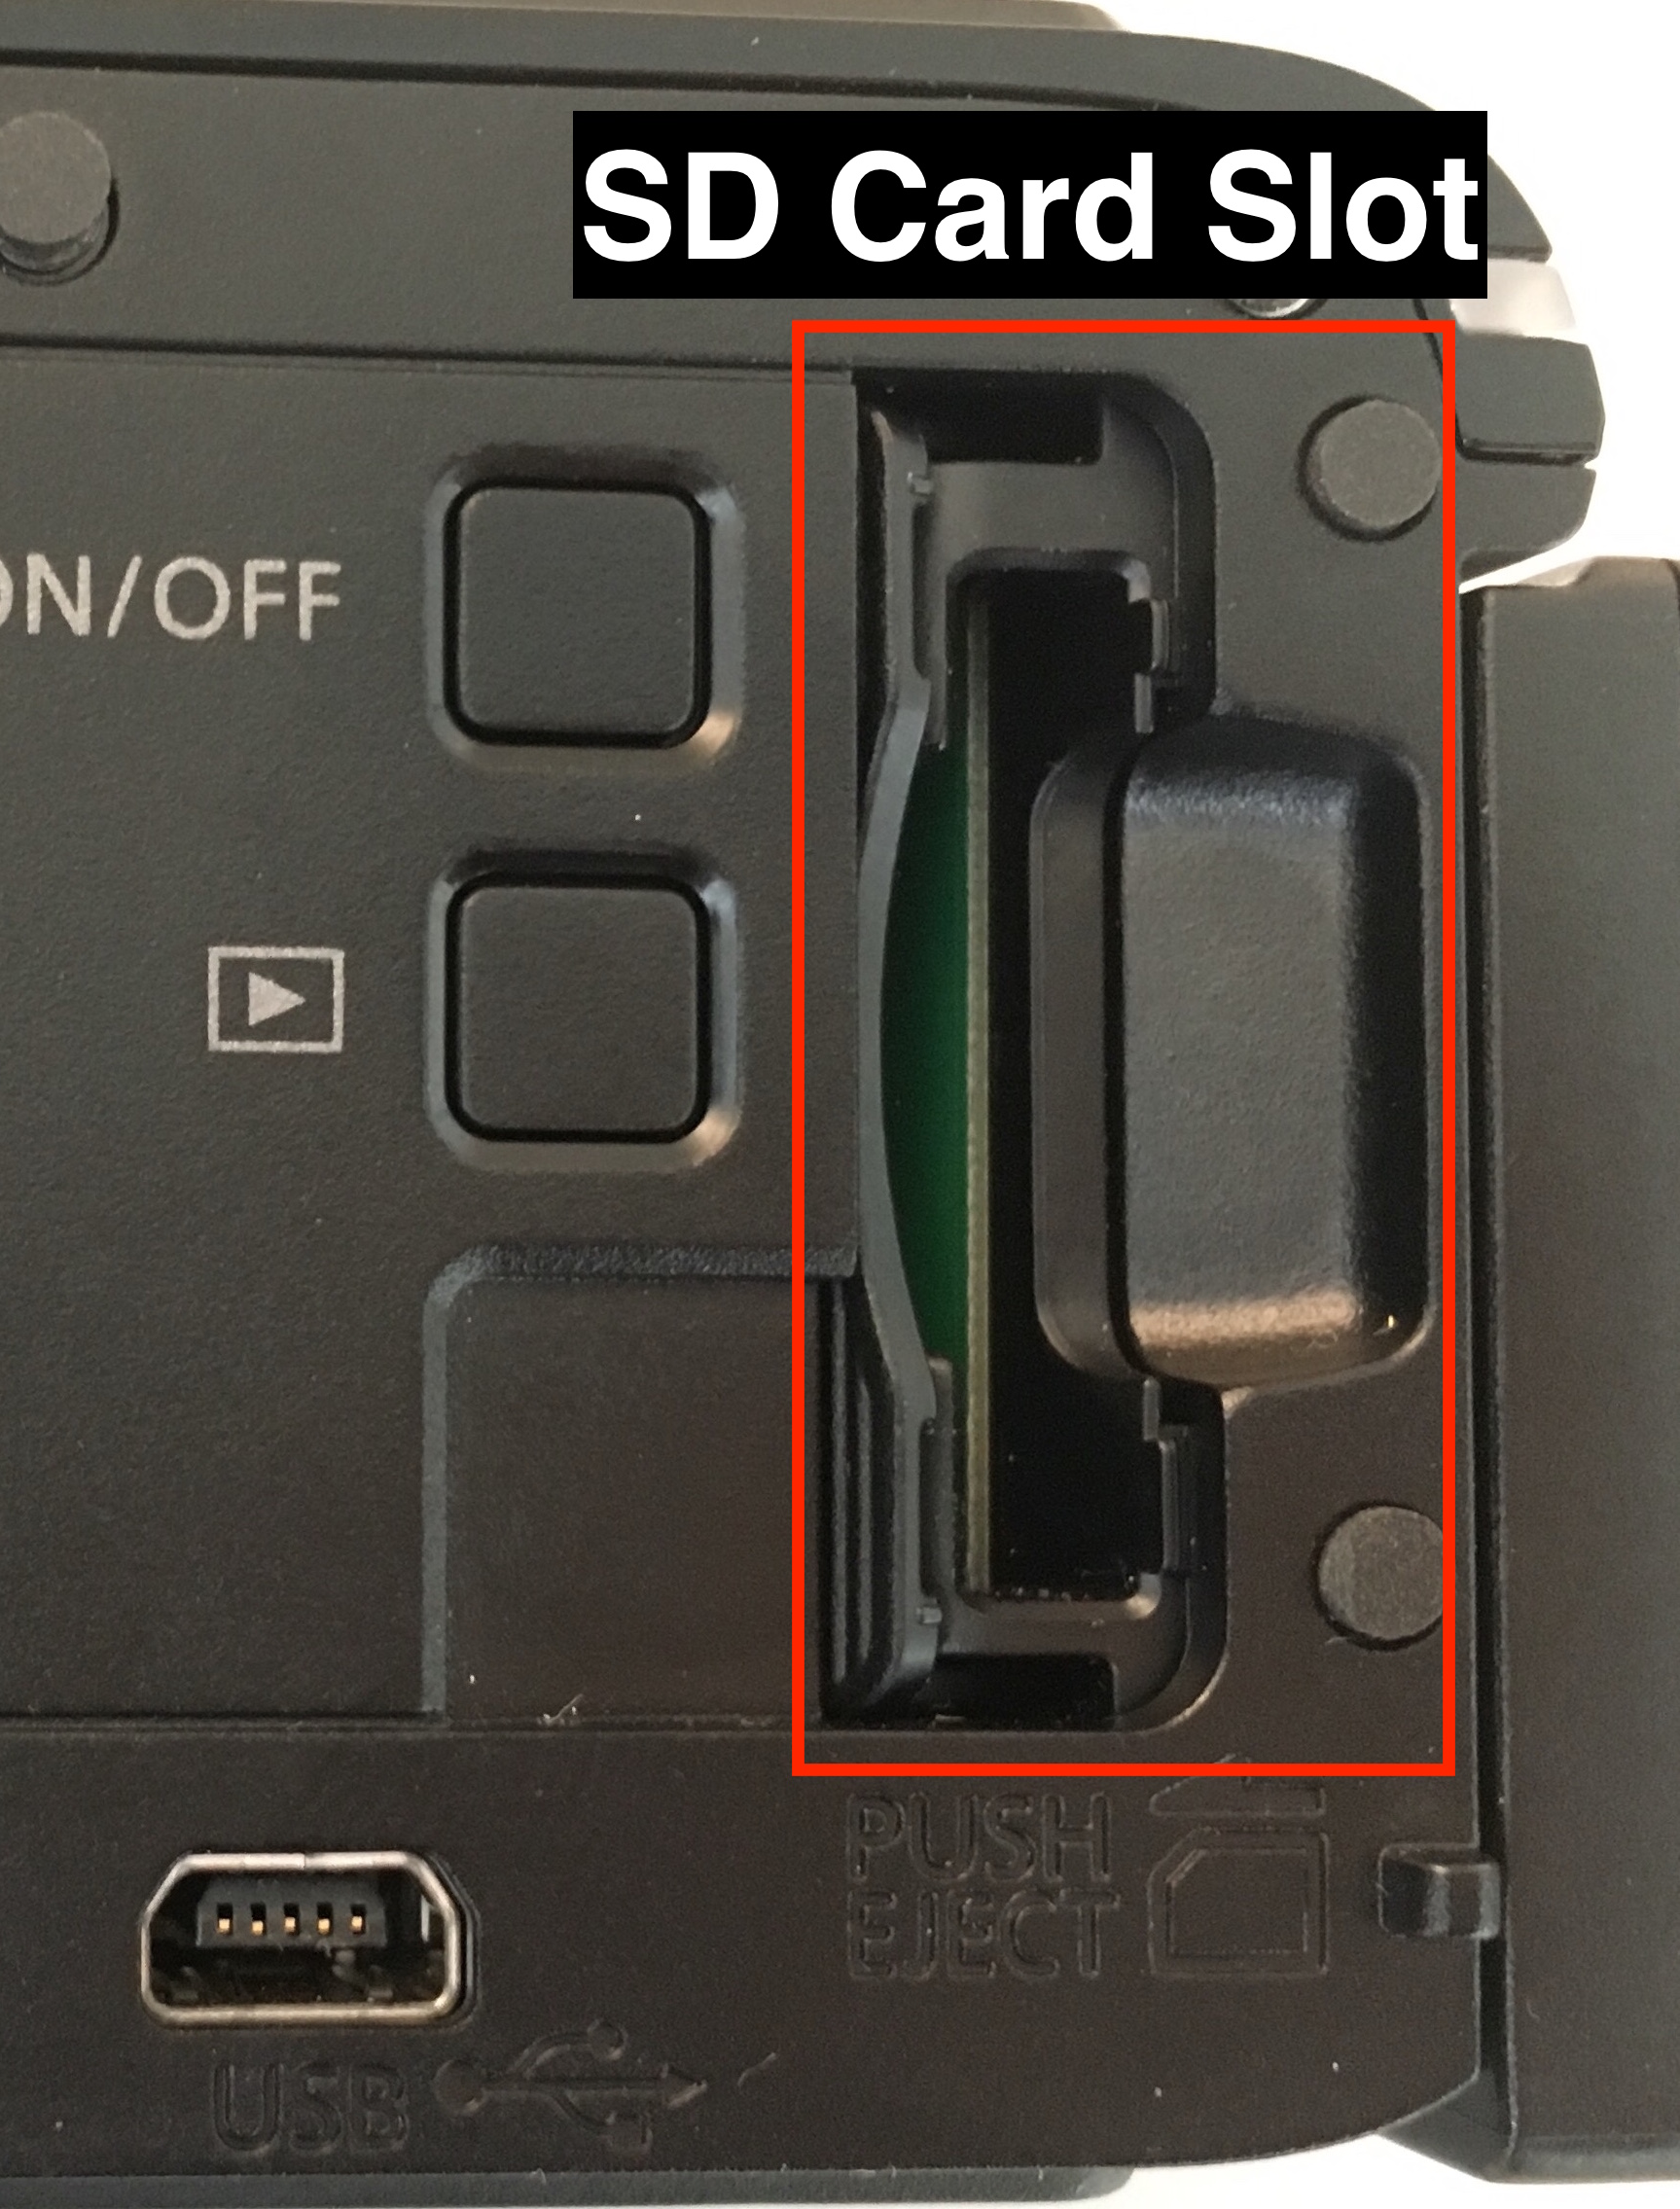
Make sure an SD card is inserted into the camera.
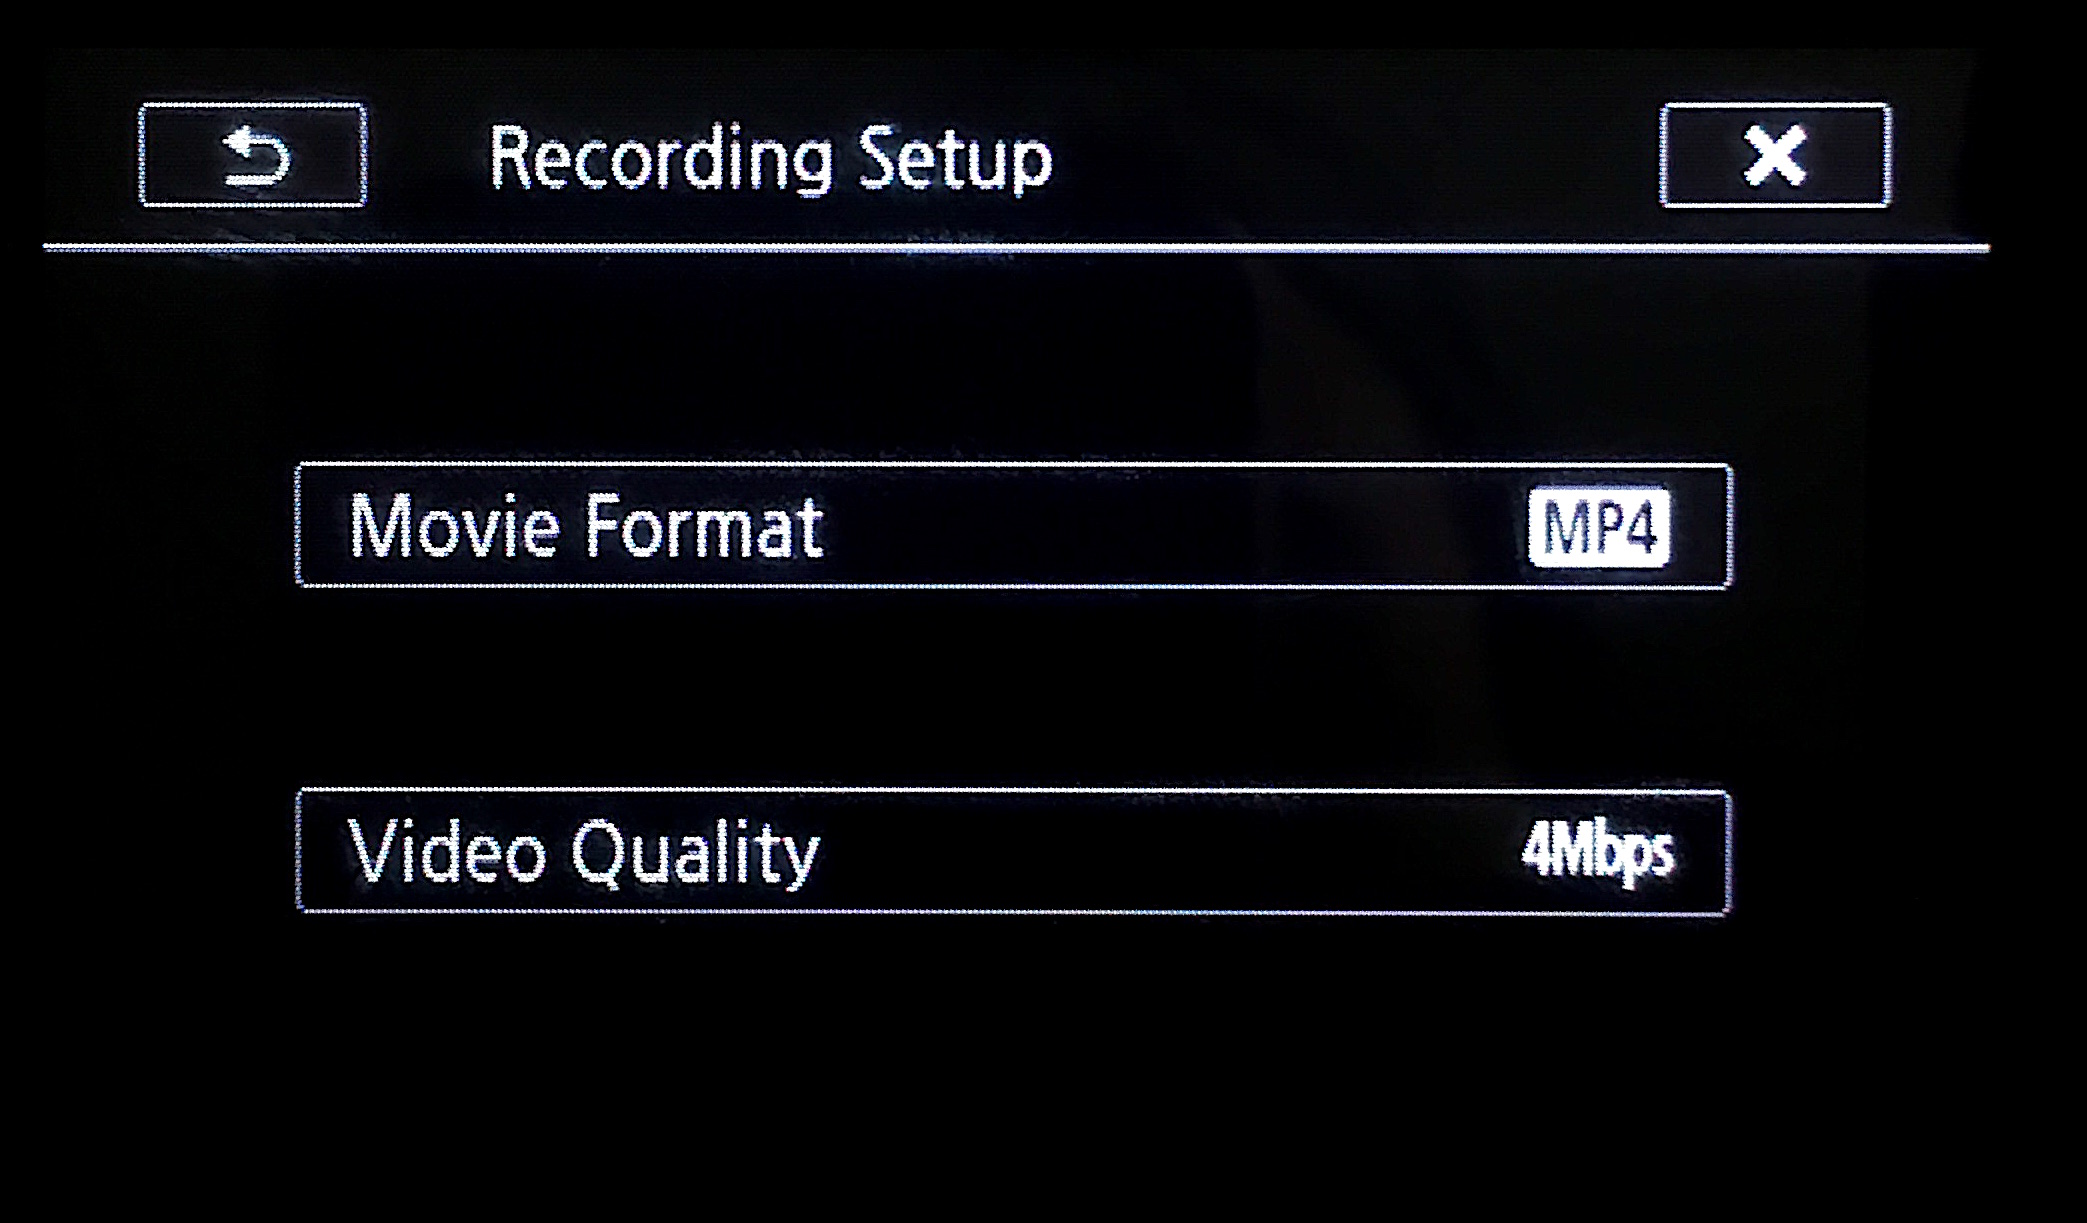
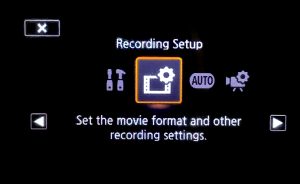
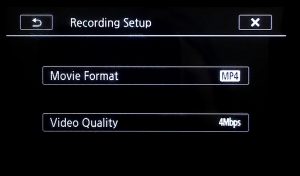
We recommend that the Standard Cameras are set up to record at 25P – MP4 – 4Mbps. This records at 1280 x 720 (720p). You can check these settings by tapping the Home icon, scrolling to ‘Recording Setup‘ and checking the ‘Movie Format‘ and ‘Video Quality‘ options.
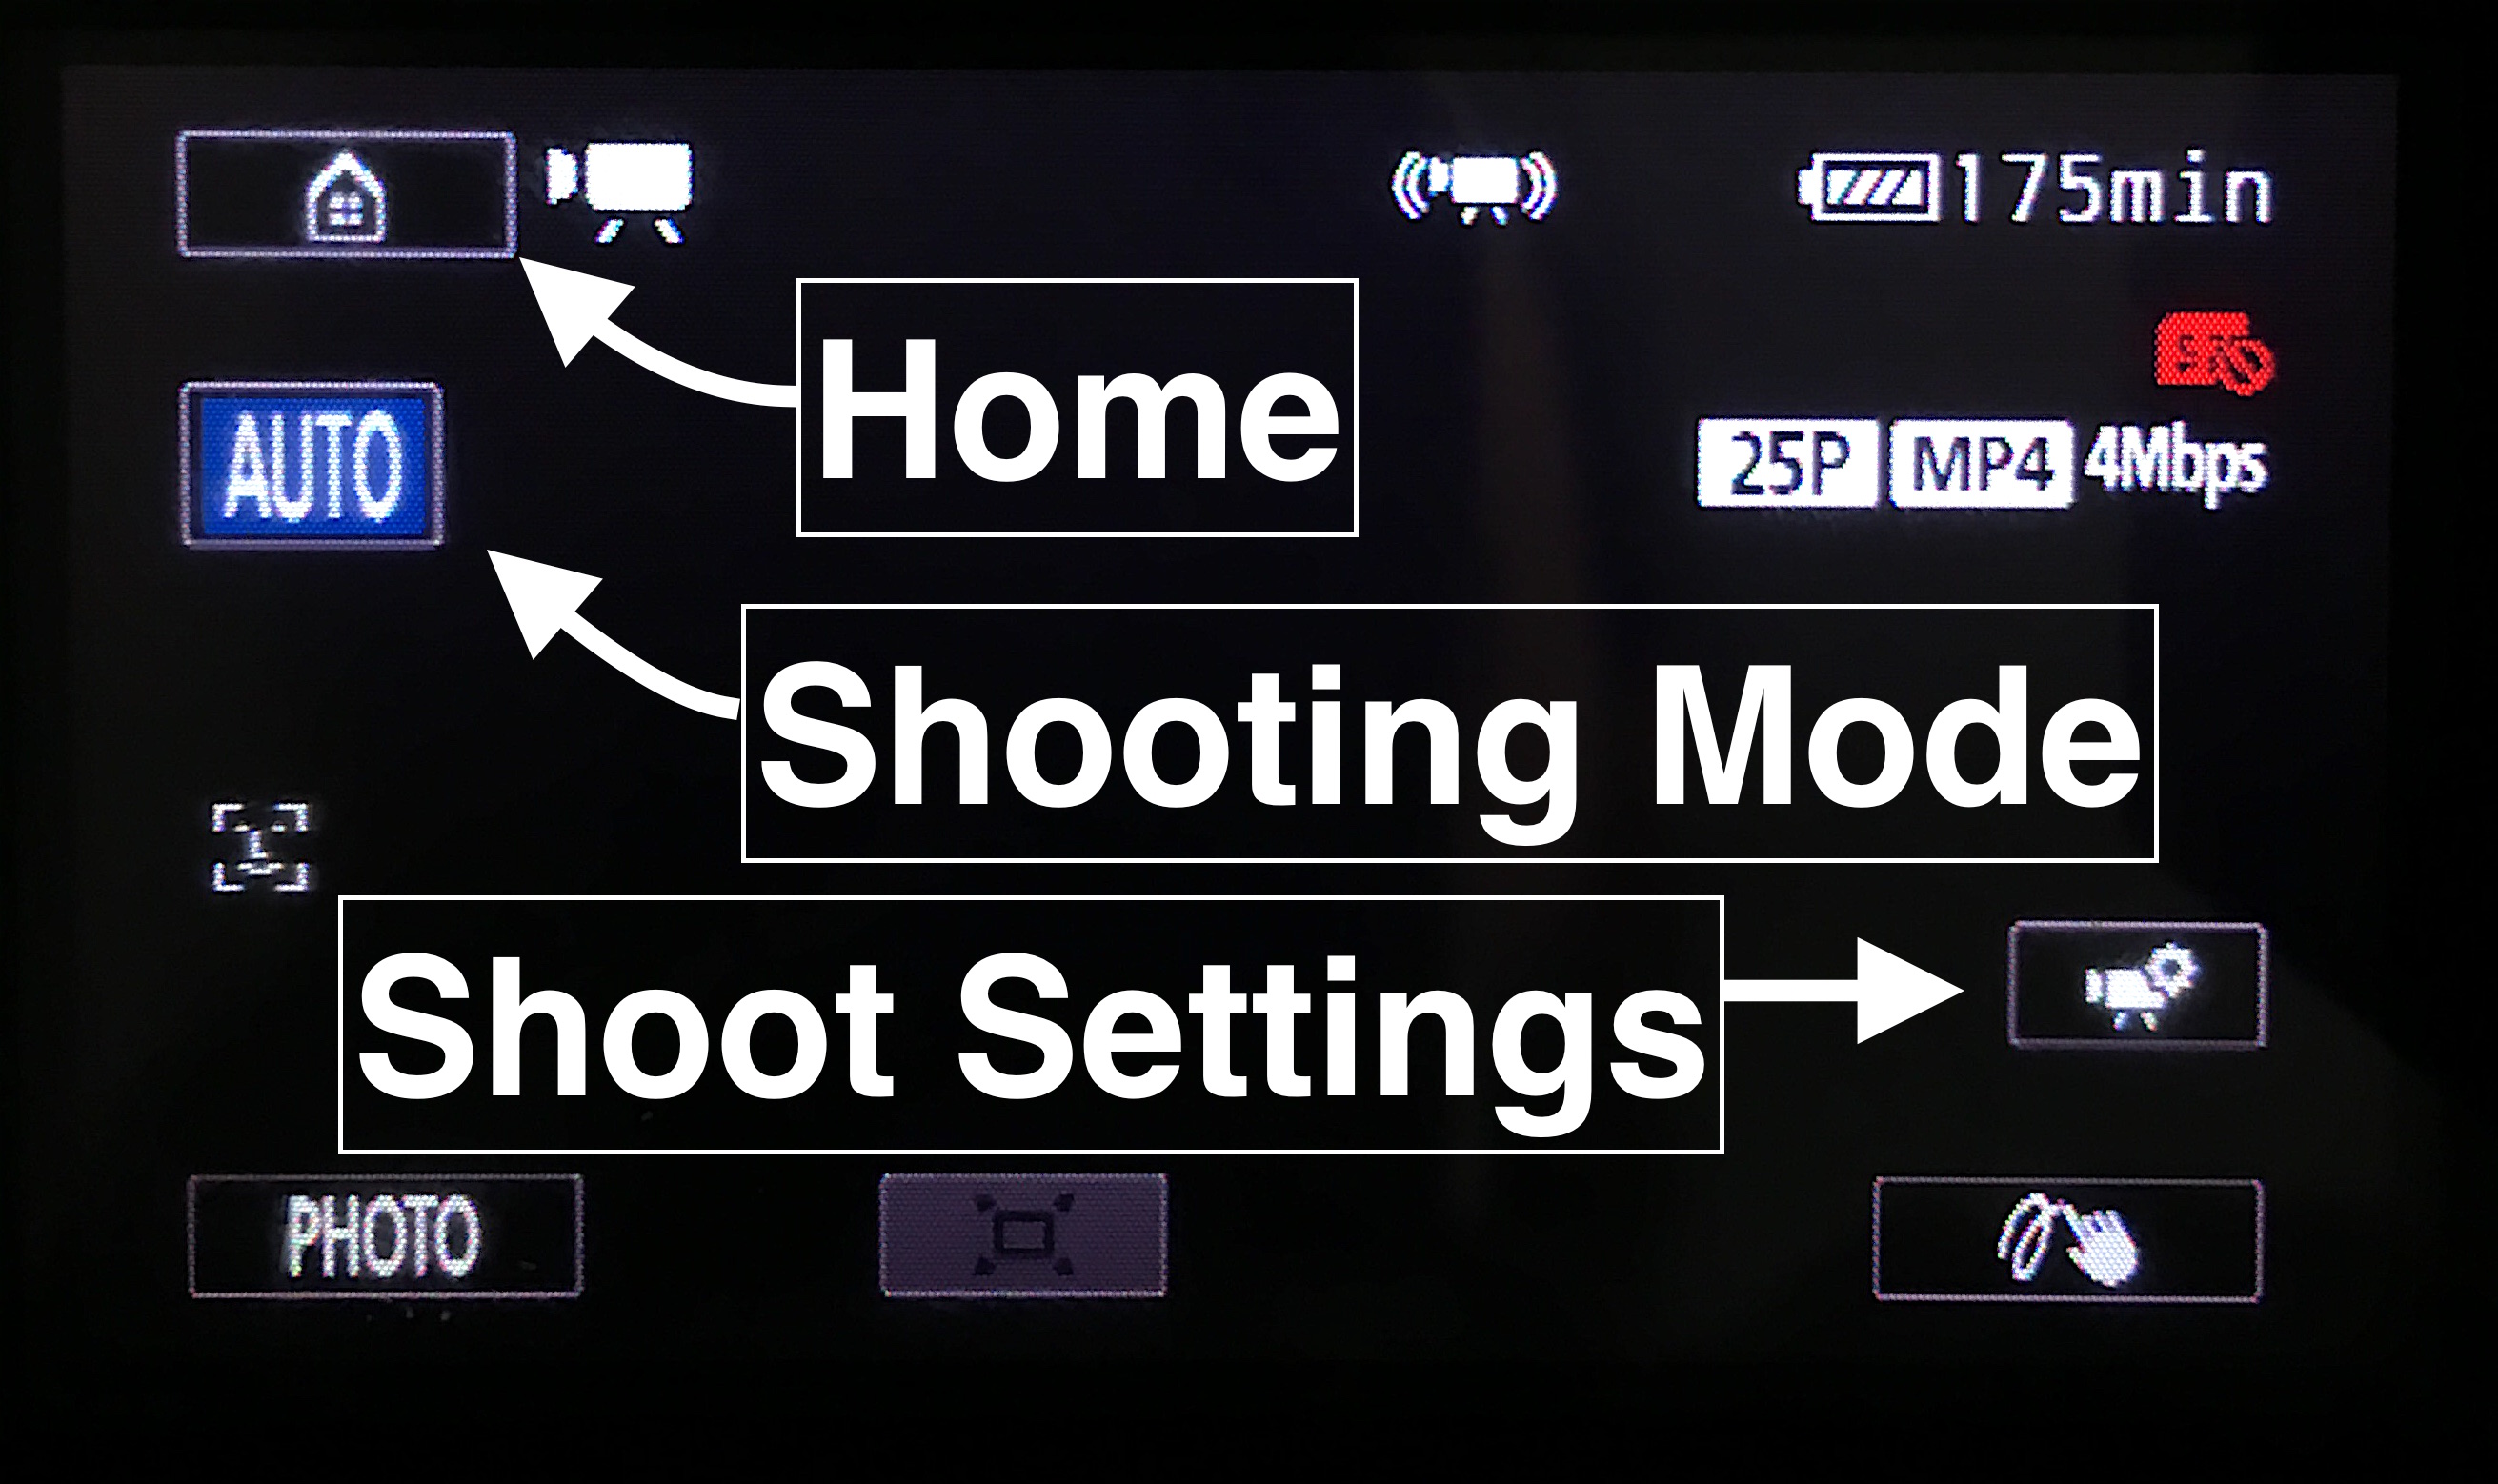

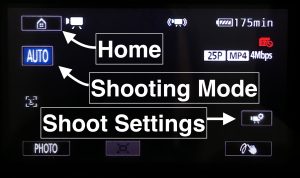
There are a few shooting modes to choose from which are all straightforward to use, you can access these by tapping the button underneath the home icon, this button will look different depending on the currently selected shooting mode.
From there you can access these shooting modes:
- Auto is the most basic of these modes and lets you shoot without having to worry about adjusting camera settings, as the camera will do this for you. This is the simplest setup and recommended for most situations.
- Cinema lets you select from a variety of creative visual filters whilst recording, if you want to make your footage look a bit more interesting without spending hours editing footage.
- Scene will have various presets for the situation you are recording in, such as shooting fast moving objects, environments with low light etc.
- Programmed AE is the advanced option here as it allows you to have more control over some of the cameras settings, you should consult the manual on what settings are available to you.
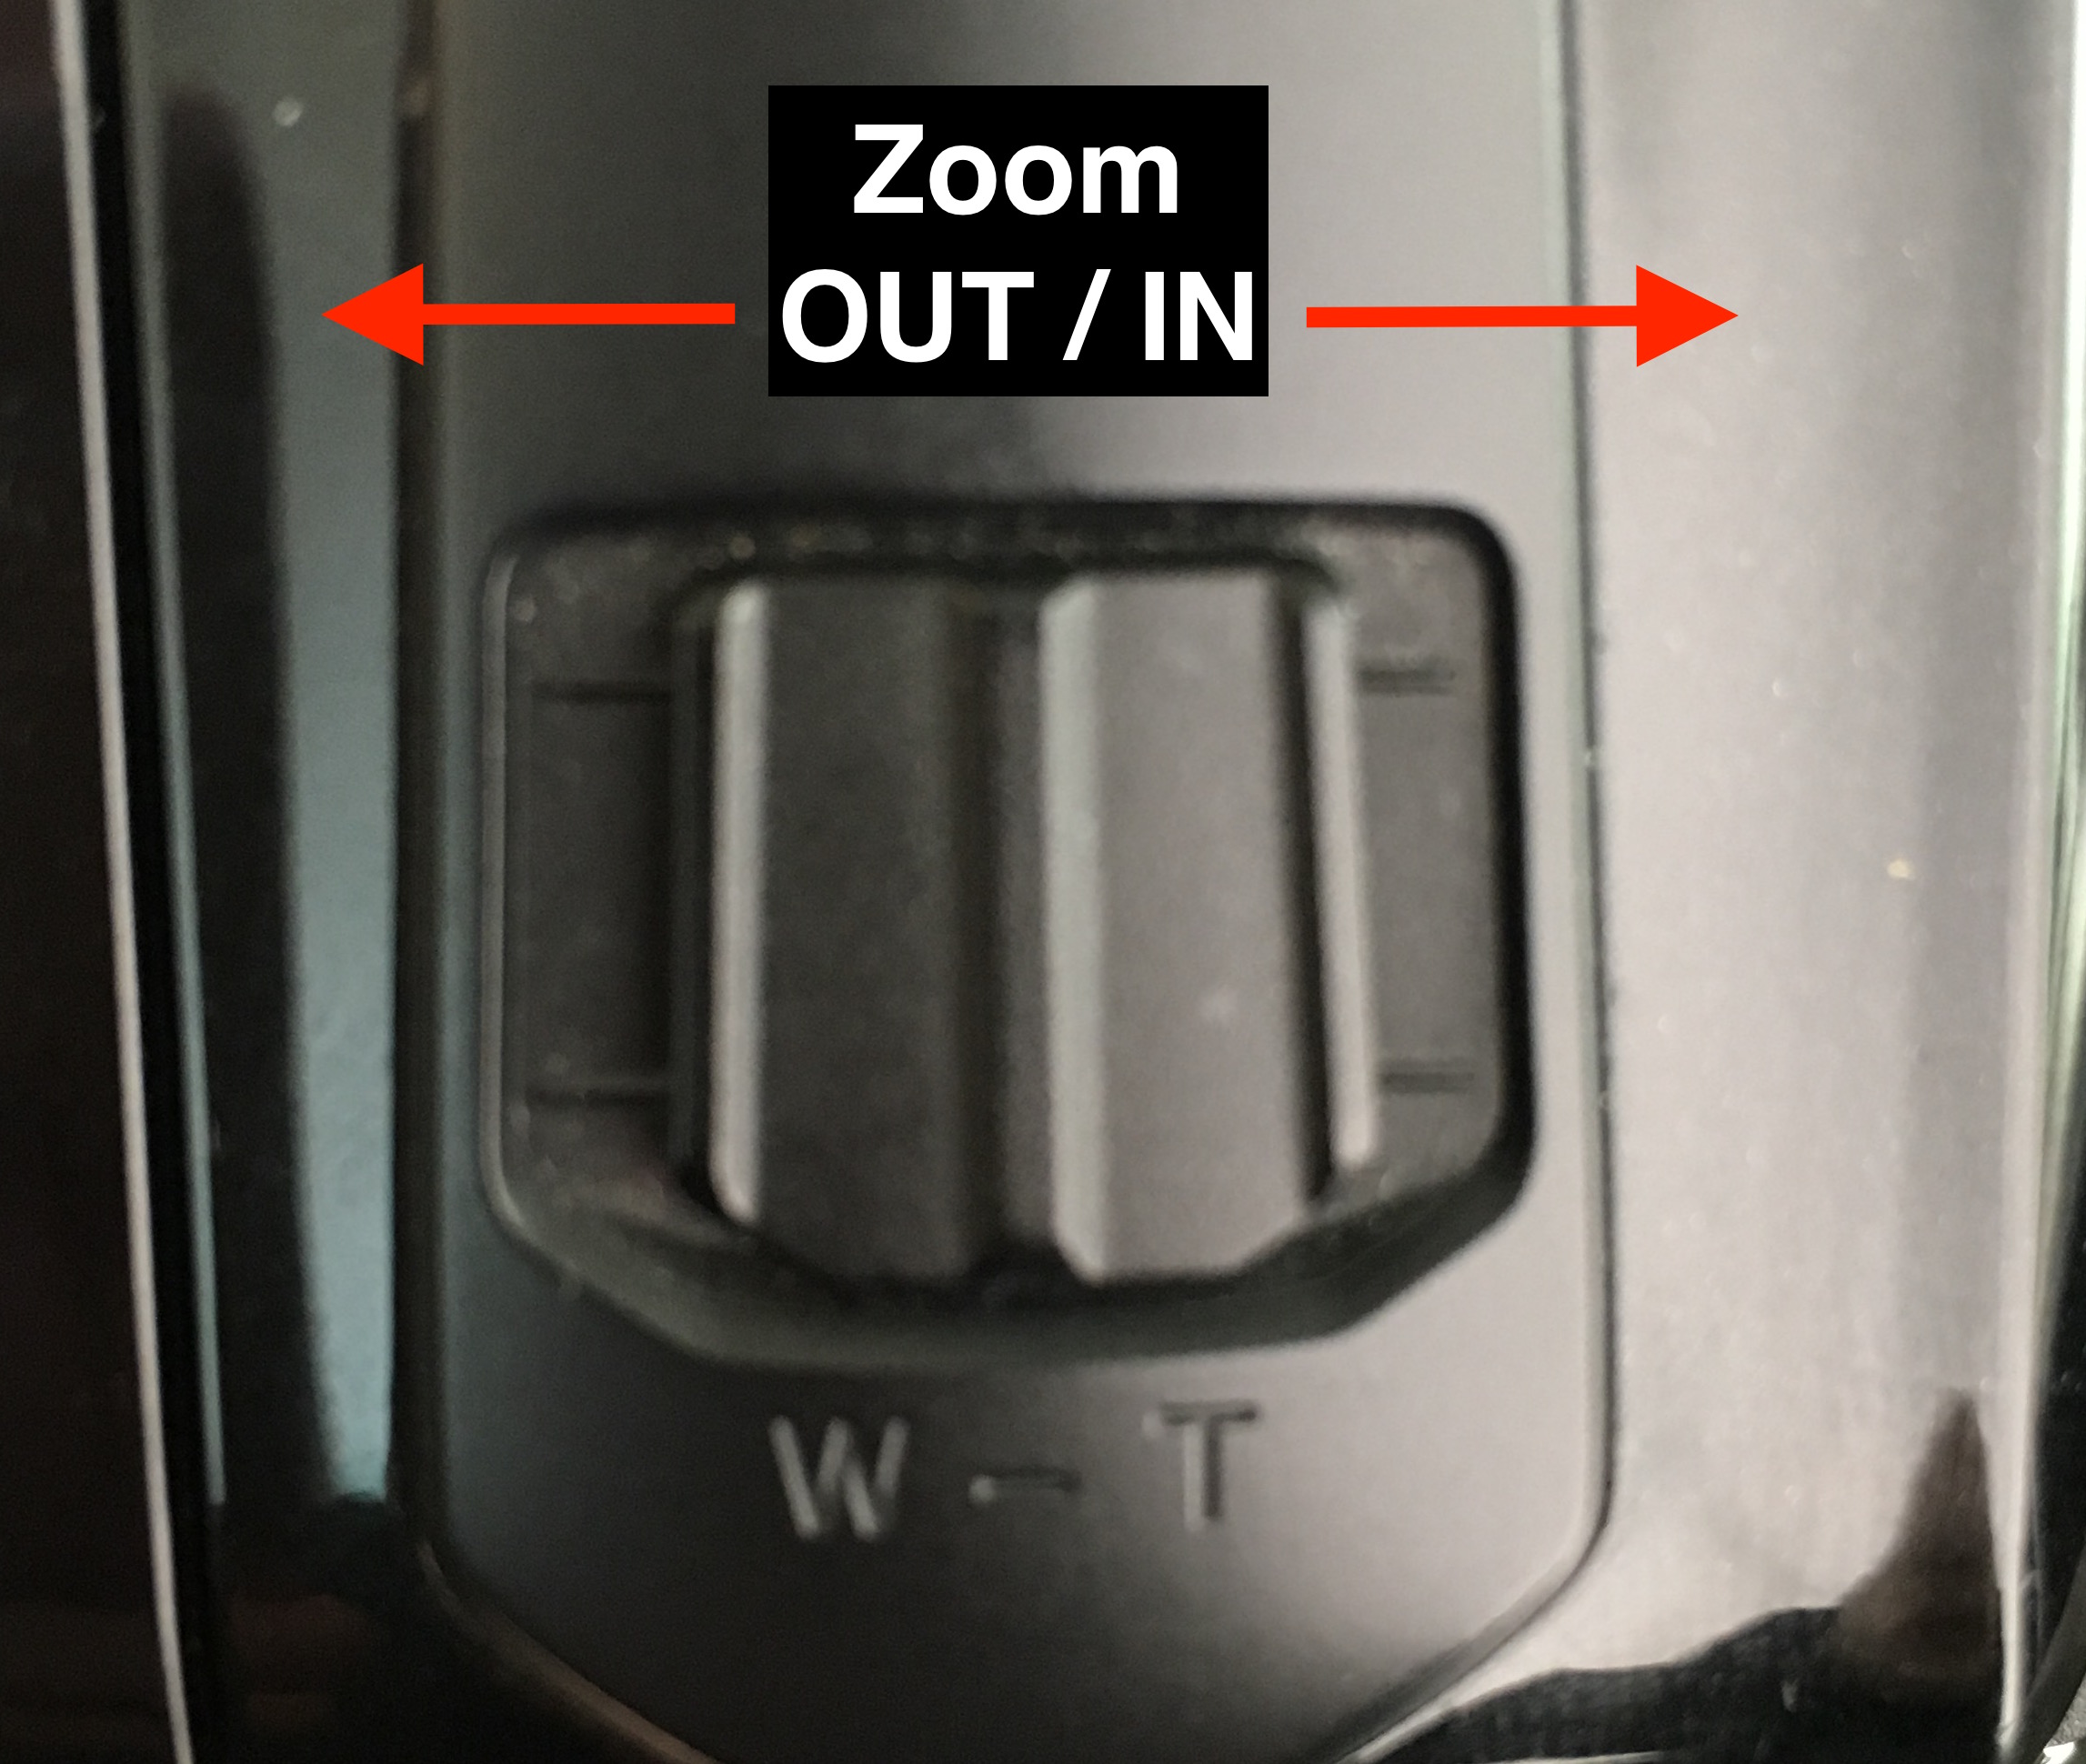
You can zoom in and out by using the slider at the top of the camera.
Recording footage
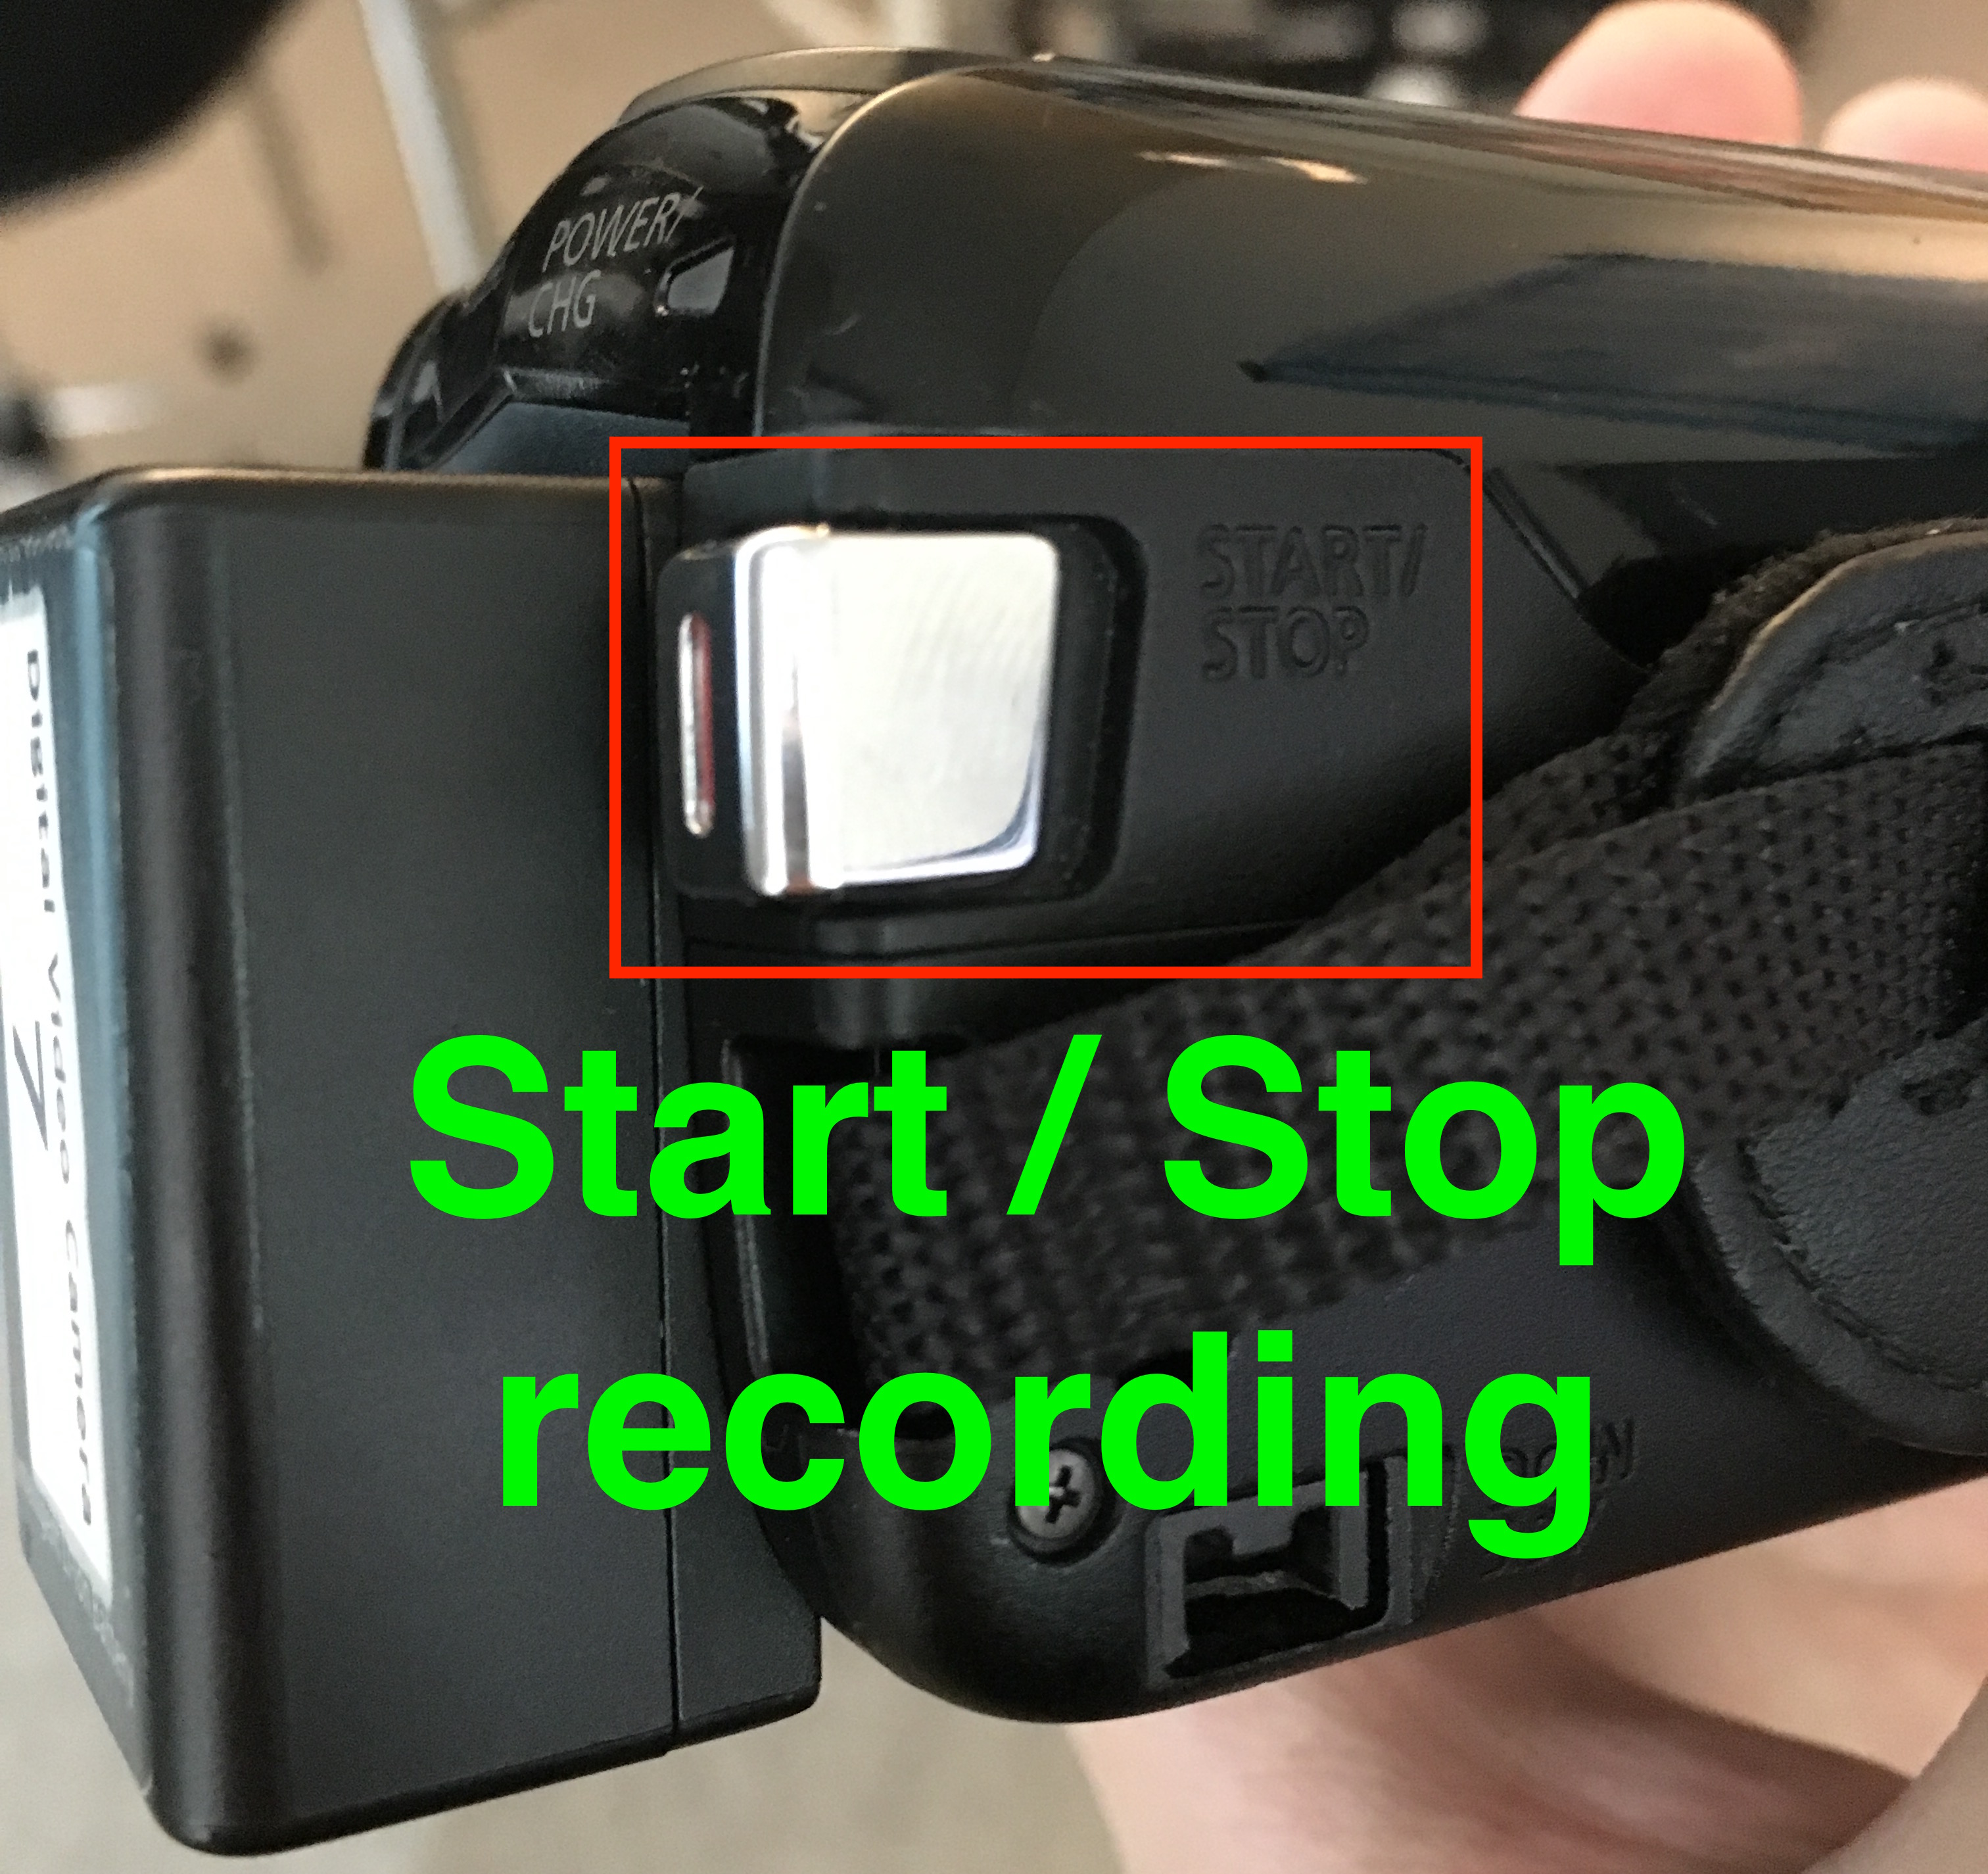
- To start recording push the START/STOP button once at the back of the camera beside the battery.

- Once you have finished recording push the START/STOP button again to end the recording.
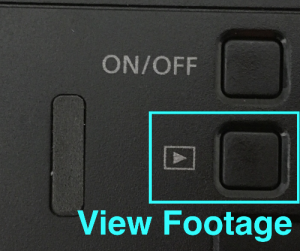
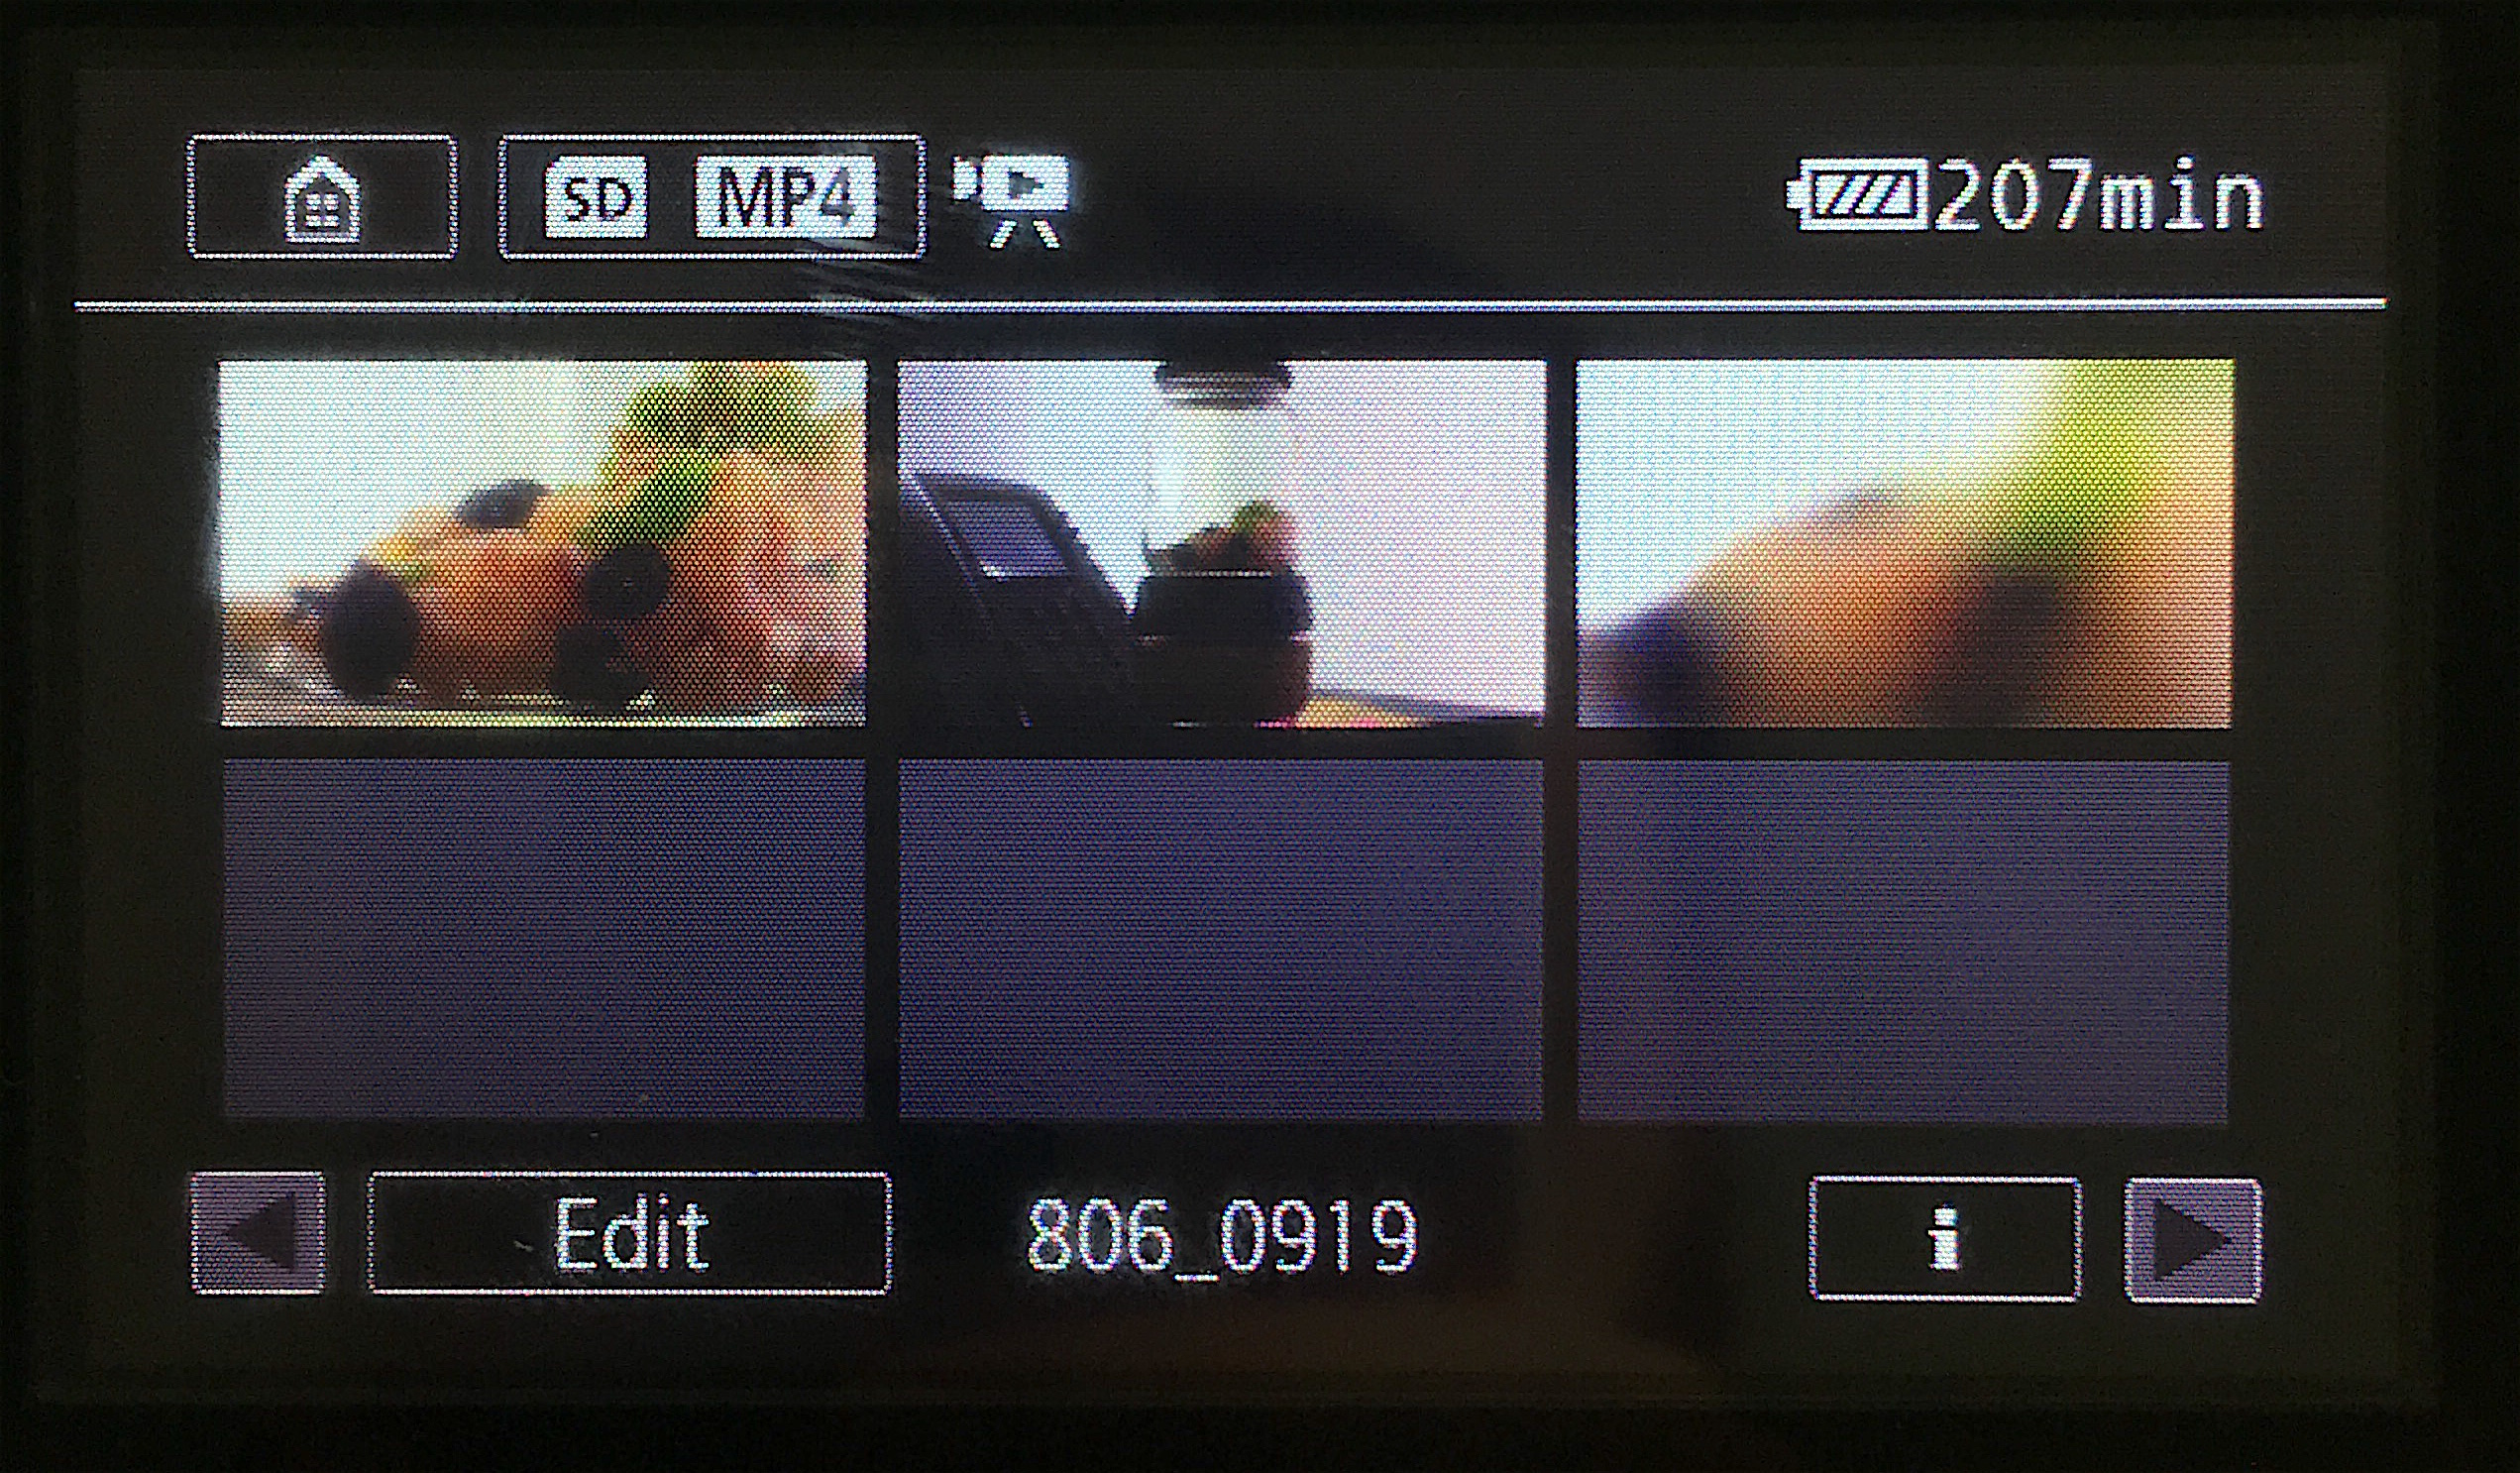
- To watch your recorded footage, push the preview button below the ON/OFF switch, on the lefthand side of the camera.
- From here you can watch your footage, and delete unwanted clips by tapping the Edit button.
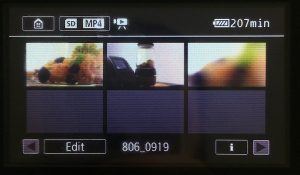
- Push the preview button again to return to shooting mode.

Please refer to the documentation at the end of this article to find the instruction manuals for your camera if you need further help.
Transferring your files to a computer
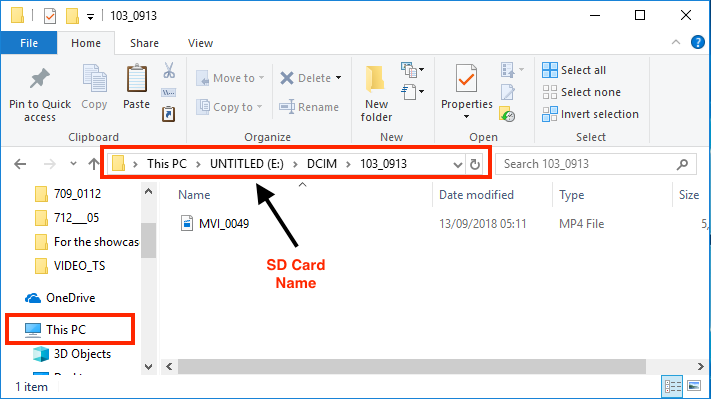
- Remove the SD card from your camera and insert it into your computers SD card reader.
- If using a Mac, open Finder, you can find your SD card under ‘Devices’ on the sidebar, open the ‘DCIM’ folder. Your video files should be in a numeric folder where you can transfer them to your computer.

If using a Windows computer, open File Explorer, click on ‘This PC’ in the sidebar, from here find your SD card and follow the same steps as above to locate the ‘DCIM’ folder and video files.
Formatting your SD card
Once you have finished transferring your footage you may want to erase the footage to free up space on the SD card.
- Insert the SD card into the camera.
- Go to the preview footage menu.
- Press the MENU button.
- Navigate to the third menu tab (spanner icon).
- Scroll down to the ‘Initialize‘ option.
- From here you can choose what you want to format, select the slot your SD card is in.
- The screen will display some information on the space used by your SD card. Press ‘Initialize‘ and ‘Yes‘ to the prompt.
Troubleshooting
How do I record using higher quality settings?
You may want to record at a higher setting. If you do this, please ensure you change the setting back to 4mbps.
To change the settings:
- Click on the icon in the top left of the screen (it looks a bit like a house)
- Scroll through the sub menus until you find Recording Setup
- Ensure Video Format is MP4 (if it’s not, press Video Format and select MP4)
- Press the video quality option and select:
4Mbps to record at 720p (1280 x 720, 25p)
17Mbps to record at 1080p (1920 x 1080, 25p)
24Mbps to record at 1080p (1920 x 1080, 25p)
35Mbps to record at 1080p (1920 x 1080, 50fps)
Please remember to reset the settings once you have finished with the equipment!
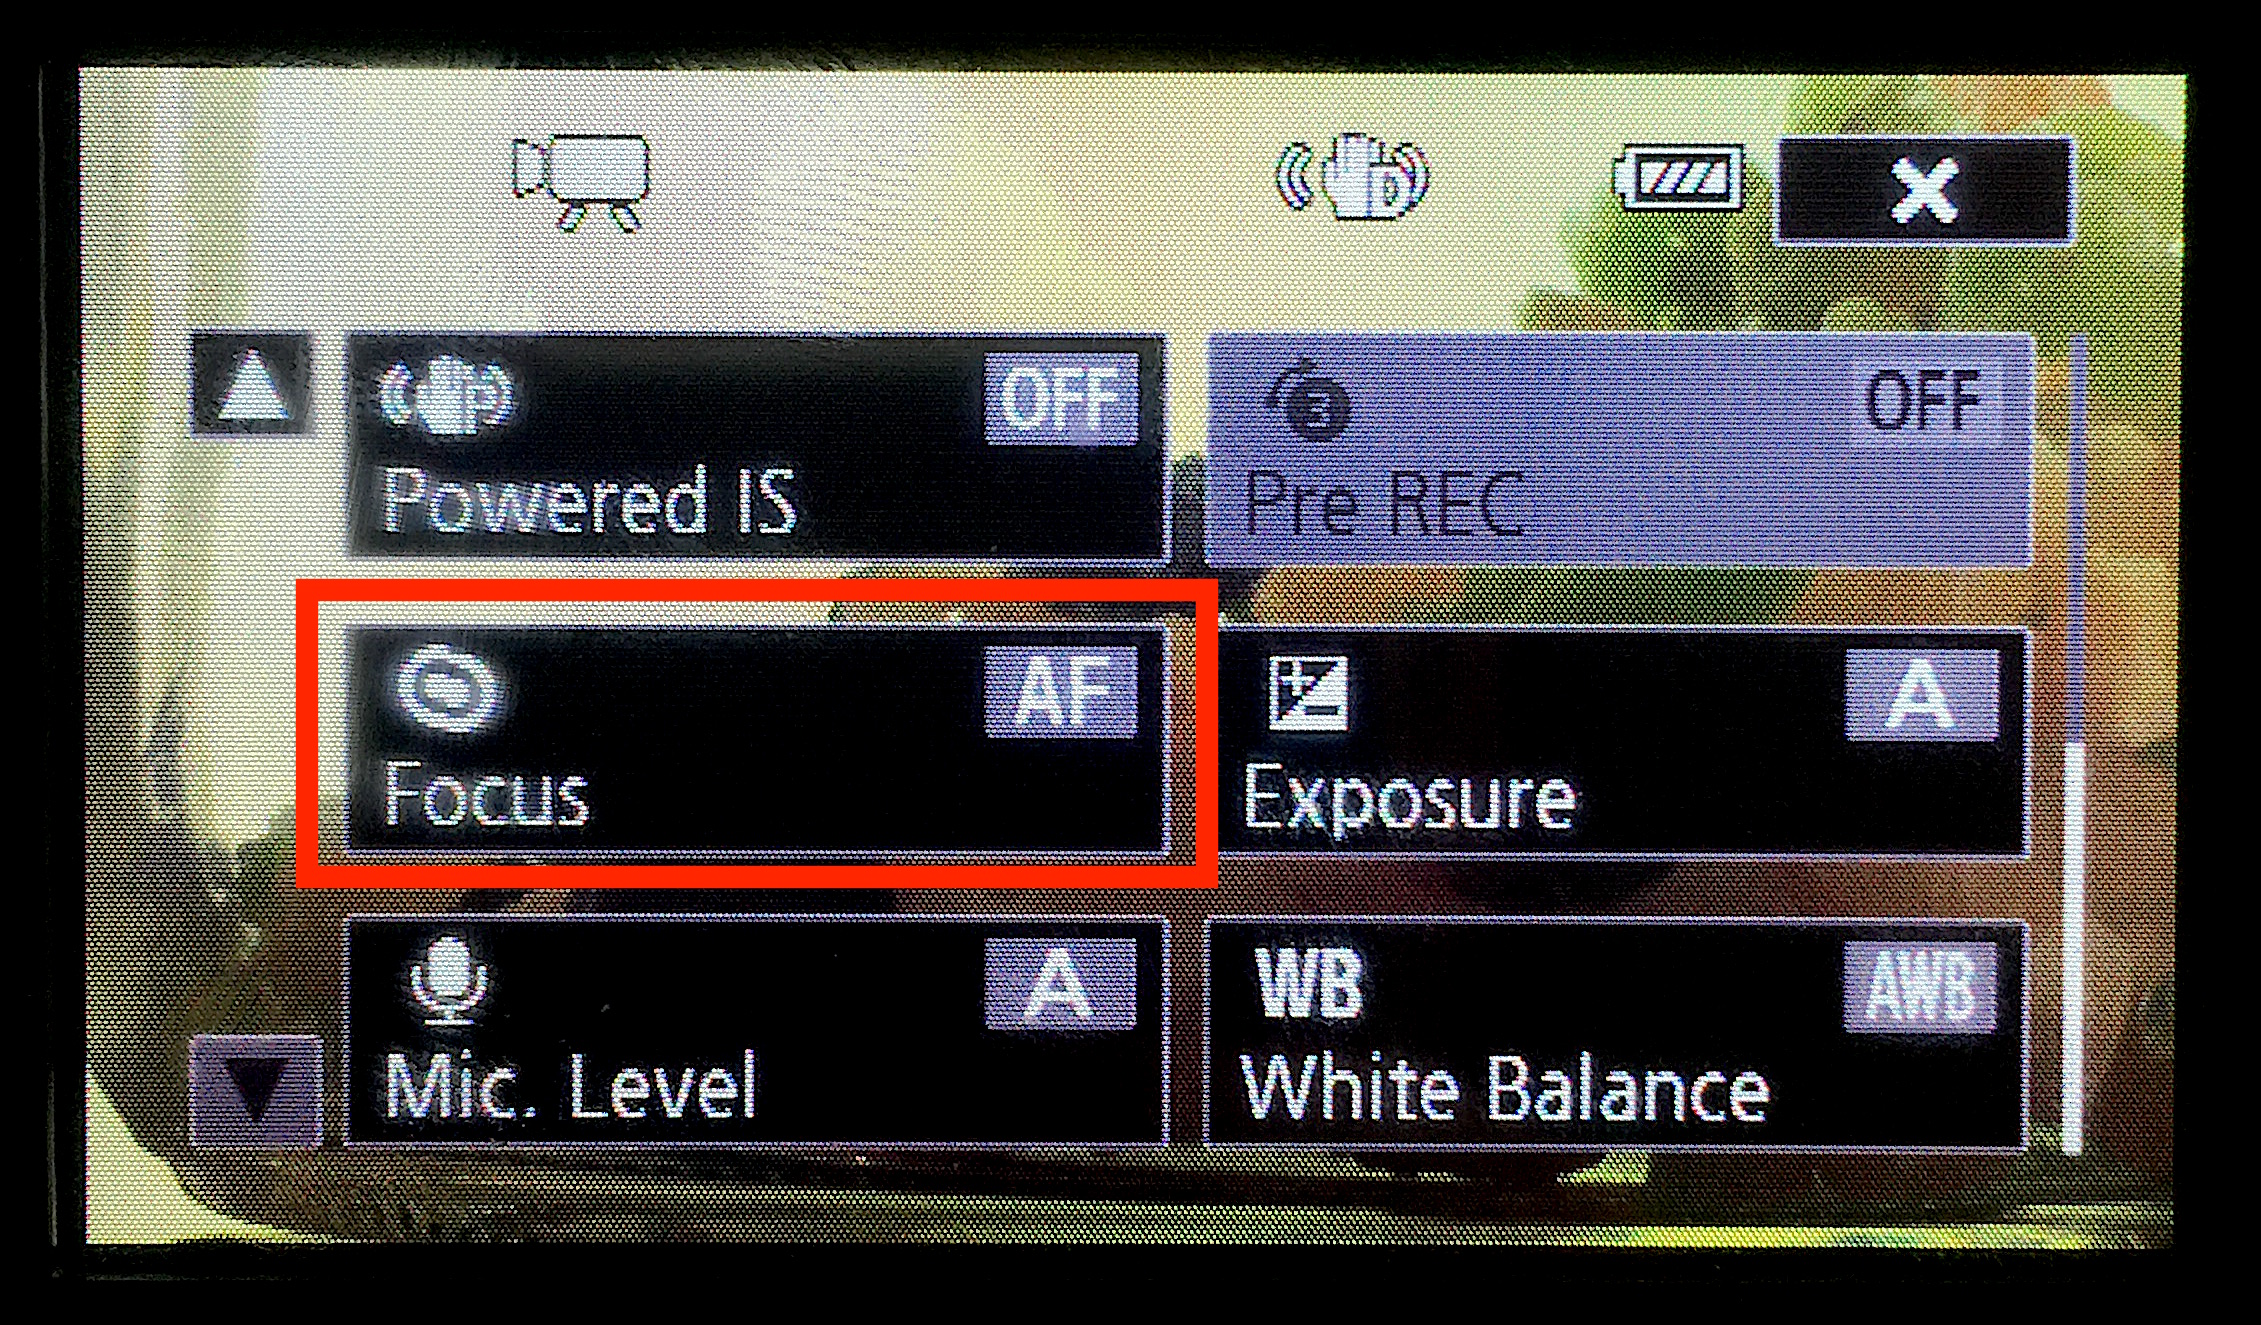
The camera keeps going out of focus
If your camera keeps shifting in and out of focus, the cameras auto focus may be struggling to find a subject to focus on. You can turn off the auto focus feature and manually focus by doing the follow:
- Tap the button below the Home icon, this icon may look different depending on what shooting mode you’re in.
- Scroll down to the ‘Programmed AE‘ shooting mode and press OK.
- Tap the shoot settings button a little above the bottom right side of the screen.

- Scroll down the list of settings until you find ‘Focus‘.
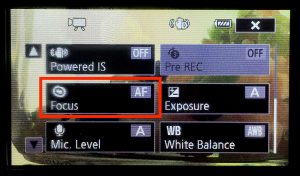
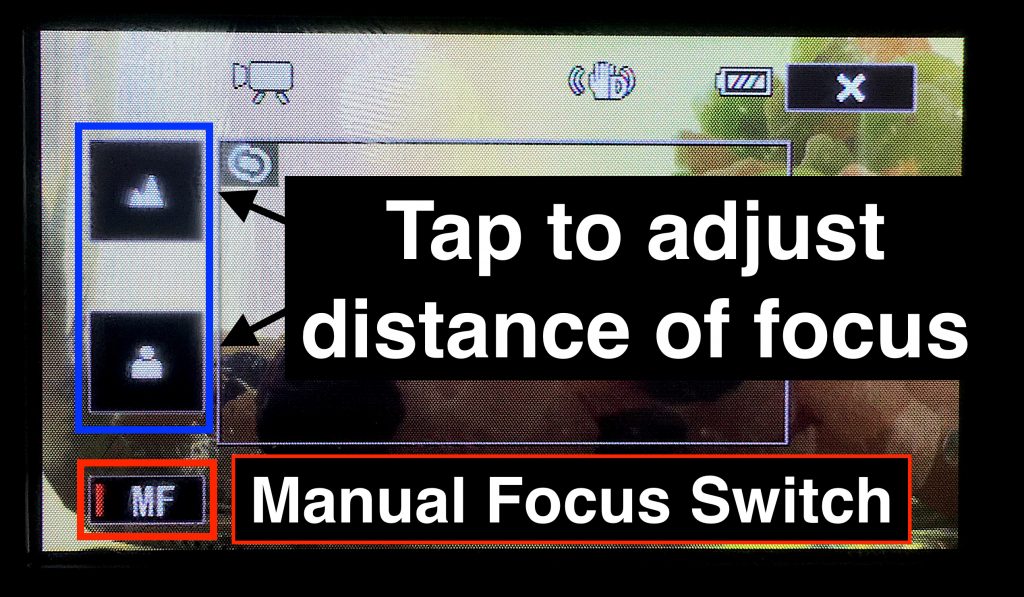
- Tap the MF button on the bottom right of the screen to turn on manual focus.
- Tap/hold the mountain icon or person icon (representing distance) to manually focus on your subject. The minimum distance the camera can focus on is 0.3m.

What SD card do I need?
SD Cards can be selected when booking items on the booking system, and suitable cards are supplied for short-term loan by AV (please note that you’ll be responsible for ensuring that any files are copied from the card to your device before you return it to AV, as SD cards are cleared upon their return).
If you’d like to get your own card for this camera, we would advise that you get a Class 10 SD Card with a minimum read and write speed of 30MB/s (please note though that these will not be fast enough for use with the 4K Cameras). This information is normally clearly written on the SD Card itself.
How to charge the batteries
As AV enable the loan of many cameras times every day, sometimes, batteries can run out quickly. We have processes to try and ensure the health and suitability of the batteries used in equipment
However, we do provide power supplies with each camera, so that the camera can be powered by the mains power, or the person using the equipment can charge the battery themselves.
Recently, we’ve noticed that the Standard Cameras are a little quirky when it comes to charging the battery, so please follow these steps:
- Ensure the supplied battery is situated securely in back of the camera
- Plug the power supply in to the wall
- Open the Camera’s display panel and press the On/Off button. The light at the back of the camera should go solid yellow.
- Press the On/Off button again. The light at the back of the camera will go to solid red – this indicates that the battery is charging.
- Wait for a length of time to give the battery time to charge.
How long can I record for on a standard video camera?
The length of time that you can record for will depend on the quality settings that you choose and how large the SD Card you are using is. The figures below give approximate times based upon an empty SD Card.
MP4
| Setting | 16GB SD Card | 32 GB SD Card | |
| MP4 – 4Mbps | 8 hours 24 minutes | 17 hours 16 minutes | |
| MP4 – 17Mbps | 2 hours 01 minutes | 4 hours 09 minutes | |
| MP4 – 24Mbps | 1 hour 26 minutes | 2 hours 57 minutes | |
| MP4 – 35Mbps | 0 hours 58 minutes | 2 hours 00 minutes |
AVCHD
| Setting | 16GB SD Card | 32 GB SD Card | |
| LP | 5 hours 56 minutes | 12 hours 11 minutes | |
| FXP | 2 hours 02 minutes | 4 hours 11 minutes | |
| MXP | 1 hour 26 minutes | 2 hours 56 minutes | |
| 50P | 1 hours 14 minutes | 2 hours 32 minutes |