
This article offers support for students and staff members who need help or guidance to make audio or video recordings from home. If you need support with any of this, please see our contact page.
Getting started with recording from home
1. Pick a room in your house to record, ideally this should have:
- Enough space for you and the camera or audio device to be placed
- Sufficient lighting if using video – ideally natural day light
- Room with least background noise – avoid places that might have traffic noise, be close to public spaces – such as the kitchen or bathroom (or you can ask your flat mates to be quiet, or even act as an audience to avoid further noises!)
- Room with soft furnishings – floor rugs and other soft furnishings on walls like acoustic padding can reduce echo and make your recording sound clearer and less muddy.
2. Pick your recording device
- If you have a device that is made for recording – for example an audio zoom, microphone set up or a camera then use these tools.
- If you do not have a specific recording device, then not to worry, you can use the following: smartphone, tablet/iPad, laptop too.
*tip if you are unsure which device to use, it can be useful to check the device capabilities (for example the quality of the camera, by simply doing a Google search or looking into your settings) – or to do a test with the ones that you are unsure with to see which is best.
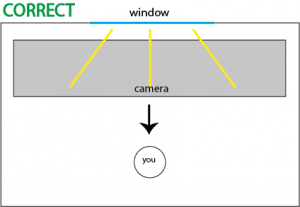
3. Choose the placement of your camera/audio device and yourself.
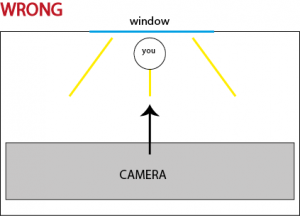
- If using a camera, make sure the device is placed in the direction of light, to avoid glare, as per example below:
- Sometimes, it might not always be possible to move your instrument (for example a piano) – so use extra lighting directed at you if there is glare. This can be house lights or a table lamp.
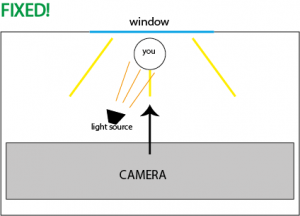
Suggested alignment with additional light source providing additional lighting on the recorded person or object - For video: make sure you are well lit – either by natural daylight (recommended) or by houselights or table lights.
- For audio (and video): make sure the device is not too close to you/the instrument (which can cause distortion) and not too far away (which can make the sound less clear).
If your room is reverberant (or echoey) try placing soft furnishings around the room, such as blankets. Having more people in a room can also soak up reverberant sound.
- Use a tripod if you have one! Or place the camera on sturdy furniture, such as a chair or a music stand!
- If using a smart phone, film horizontally (not vertically) so you get a nice wide shot!
*tip: some devices have gain control – so you can adjust this according to your level
4. Do a test recording
- This is very important! Do a 2 minute test recording of your loudest and quietest moments. Listen back with headphones, as usually phone/laptop/camera speakers are not a true representation of the recorded sound.
- Make any adjustments – for example your sound is too loud, so you move your device further away, or the picture is not clear, so you add extra lighting.
5. Make your recording!
6. Listen back, edit (if need be) and transfer
- Make sure to listen back to the full recording!
- We strongly discourage editing audio recordings, as it can negatively affect the quality of the recording.
- However if you really need to edit, most smart phones and laptops have in built software with which you can make basic trims. There is more advanced free software such as DaVinci Resolve, with which you can make more complex trims and formatting of files. A range of software options are highlighted on the Making video content article.
- Transfer the recording – there are many ways to transfer the recording from your device onto a computer or submission page. Most portable devices such as smart phones, can be connected with a USB cable. *Please note: some phones need an app to be installed on the computer in order to be able to read your files. See the article on Getting files from one device to another for further guidance and suggestions on transferring files. There is also advice available on preparing videos for upload to eStream.
7. Make the above part of your preparatory practice
- You will be more relaxed if it is a part of your ‘performance’ routine.
- You can listen to your performance more objectively and focus practice on musical areas of concern.
Useful Links
How to Make Videos with Just your phone
Record better sound with your smart phone
Using lighting when recording at home
For those wanting to invest:
Lavalier (£13) or clip on (£24) mini jack mic for phone
Rode mic for smart phone (£45)
Tripod for smartphone (£20)
Zoom Camera (£120 – 160)
Zoom Audio H1 (£80)
(please note that these are suggestions for those who might wish to make recordings in the future!)
Getting additional support
Contact details for AV Support for the Faculty of Music and Faculty of Dance can be found on the Contact page.